Home Blog Details


Home Blog Details
Post By Autozcrave || 2025-08-07
Keeping your car looking new is not easy, especially with daily use. Dust, stones, scratches, and sunlight can damage your car's paint. That’s where Paint Protection Film (PPF) comes in. It is one of the best ways to protect your car’s paint. But many car owners ask, “How is PPF installed?” In this blog, we will explain the PPF installation process step by step in simple words.
.jpeg)
PPF, or Paint Protection Film, is a clear, thin film that is applied over the car's paint. It protects the paint from scratches, stone chips, bird droppings, and other damage. Some PPF films are also self healing, which means small scratches on the film disappear on their own. Many car owners also ask about ceramic coating vs PPF, but PPF gives better physical protection than ceramic coatings.
Before we explain the steps, let us quickly look at the benefits of PPF installation:
Now, let’s understand how professionals do car PPF installation. Here is a full PPF step-by-step guide in easy words:
Step 1: Washing the Car
First, the car is washed completely. All the dust, mud, and oil must be removed. This is very important for the film to stick properly. The detailer may use clay bar and alcohol-based cleaner to make sure the surface is super clean.
Step 2: Paint Correction (If Needed)
If your car has small scratches or swirl marks, the installer will remove them using paint correction. This makes the surface smooth. If not removed, the marks will remain under the film and reduce the final look.
Step 3: Preparing the Film
Now, the PPF film for cars is cut according to the size of the car’s panels. Some installers use pre-cut kits while others cut it manually. The shape and size must match the panel perfectly.
Step 4: Using PPF Water Solution
A special PPF water solution (also called slip solution) is sprayed on the car’s panel. This helps the installer move the film easily while placing it. It is usually made with clean water and a few drops of shampoo.
Step 5: Placing the Film
Now, the film is carefully placed on the wet surface. The installer adjusts it until it fits the shape and curves of the panel. This is where skill is very important to avoid wrinkles or bubbles.
Step 6: Squeegee the Film
After placing the film, the installer uses a squeegee to remove the water and air under the film. This tool helps the film stick properly to the surface. A soft squeegee is used so that the film does not get scratched.
Step 7: Wrapping the Edges
Professional installers also do PPF edges wrapping. This means they tuck the film slightly under the panel or around the corners so that it doesn’t peel off later. Heat guns may be used to make the film flexible during wrapping.
Step 8: Drying and Curing Time
Once all panels are covered, the car is left to dry and cure. The PPF curing time depends on the weather and film quality. Usually, it takes 24 to 48 hours. During this time, do not wash the car or touch the film.
Many car owners ask, how long does PPF installation take? The answer depends on how much of your car is being covered. Here's a rough idea:
Professional installers take their time because clear bra installation needs full attention.
You can try DIY PPF installation, but it is not easy. You need a dust-free room, proper tools, and lots of experience. Small mistakes like trapped air, uneven cuts, or dirty surfaces can spoil the result. That’s why most people choose professional PPF installation.
The best PPF installation temperature is between 20°C and 30°C. That’s why professionals do it in a closed detailing studio. Outdoor installations are not recommended because dust and wind can cause problems.
Yes, absolutely. If you love your car and want to keep it looking new for years, PPF installation is the best choice. It gives car paint protection, prevents minor damage, and reduces the cost of repainting in the long run.
Now that you understand the PPF installation process, you can make a smart decision. Whether you are planning to get it installed or just learning, knowing the steps helps you choose better service.
PPF is not just a film it is protection for your car. From self healing PPF film to advanced car detailing protection, today’s technology offers everything to keep your car looking brand new.
So the next time you think about protecting your car’s paint, remember this easy PPF step by step guide. Choose quality, choose professionals, and give your car the protection it truly deserves.
PPF stands for Paint Protection Film. It is a clear, self-healing film applied to a car's painted surface to protect it from scratches, stone chips, stains, and UV rays.
Both offer protection, but in different ways. PPF provides physical protection from scratches and chips, while ceramic coating protects against water spots, UV, and dirt. For full protection, many people choose to install both.
The PPF installation time depends on the coverage. It can take anywhere from 2 hours (for small areas) to 2 days (for full car coverage).
DIY PPF installation is possible, but it's difficult and requires proper tools and a clean environment. For best results and long-lasting protection, it’s better to get professional PPF installation.
High-quality PPF films can last 5 to 10 years, depending on the brand, installation quality, and how well you maintain it.
PPF curing time is usually 24 to 48 hours. During this period, avoid washing the car or exposing it to heavy rain or dust.
No, if the PPF is removed properly by a professional, it will not damage the paint. In fact, it will leave the paint underneath in excellent condition.
Yes. Professional installers use a method called PPF edge wrapping to hide the edges and give a cleaner, long-lasting finish.
PPF is a clear film, so it is almost invisible when applied properly. It enhances the look of the paint and makes it glossier.
Absolutely. With dust, stones, harsh sunlight, and heavy rains, car paint protection becomes very important in India. PPF installation protects your car in all these conditions.


Most people install a sun control film for car to reduce heat, but there’s another factor that often gets ignored—UV exposure while driving. In a country like India, where sunlight intensity is high for most of the year, long hours behind the wheel can quietly expose your skin to harmful ultraviolet rays.
The common assumption is that car glass already blocks UV radiation. That’s only partially true.
Standard automotive glass blocks a portion of UVB rays, but UVA rays—responsible for skin ageing and long-term damage—can still pass through. This is why even regular drivers experience tanning, uneven skin tone, and in extreme cases, long-term skin issues despite being inside the car.

When people search for sun control film price in India, the expectation is simple—find something affordable that reduces heat. But pricing in this category varies widely, and without understanding what drives that difference, it’s easy to either overpay or choose a film that doesn’t perform.
The price of a window film for car is not just about brand—it’s about technology.

When choosing a car window tint film, most people get stuck comparing types—ceramic, carbon, or dyed. On paper, they all promise heat reduction and comfort. But in real Indian conditions, where temperatures push limits, the difference between these options becomes much more noticeable.
Understanding this difference is what helps you avoid wasting money on the wrong film.

If your goal is simple—reduce heat inside your car—then choosing just any window film for car won’t get the job done. Indian summers are not mild, and most basic window tint films simply aren’t designed to handle that level of heat. This is why many car owners install a film and still feel disappointed when the cabin temperature barely improves.
The key mistake is focusing on shade instead of heat rejection.
A lot of car owners hesitate before installing a sun control film for car because of one simple doubt—does it actually work, or is it just another overhyped product? This confusion usually comes from past experiences with low-quality window tint films that didn’t deliver noticeable results.
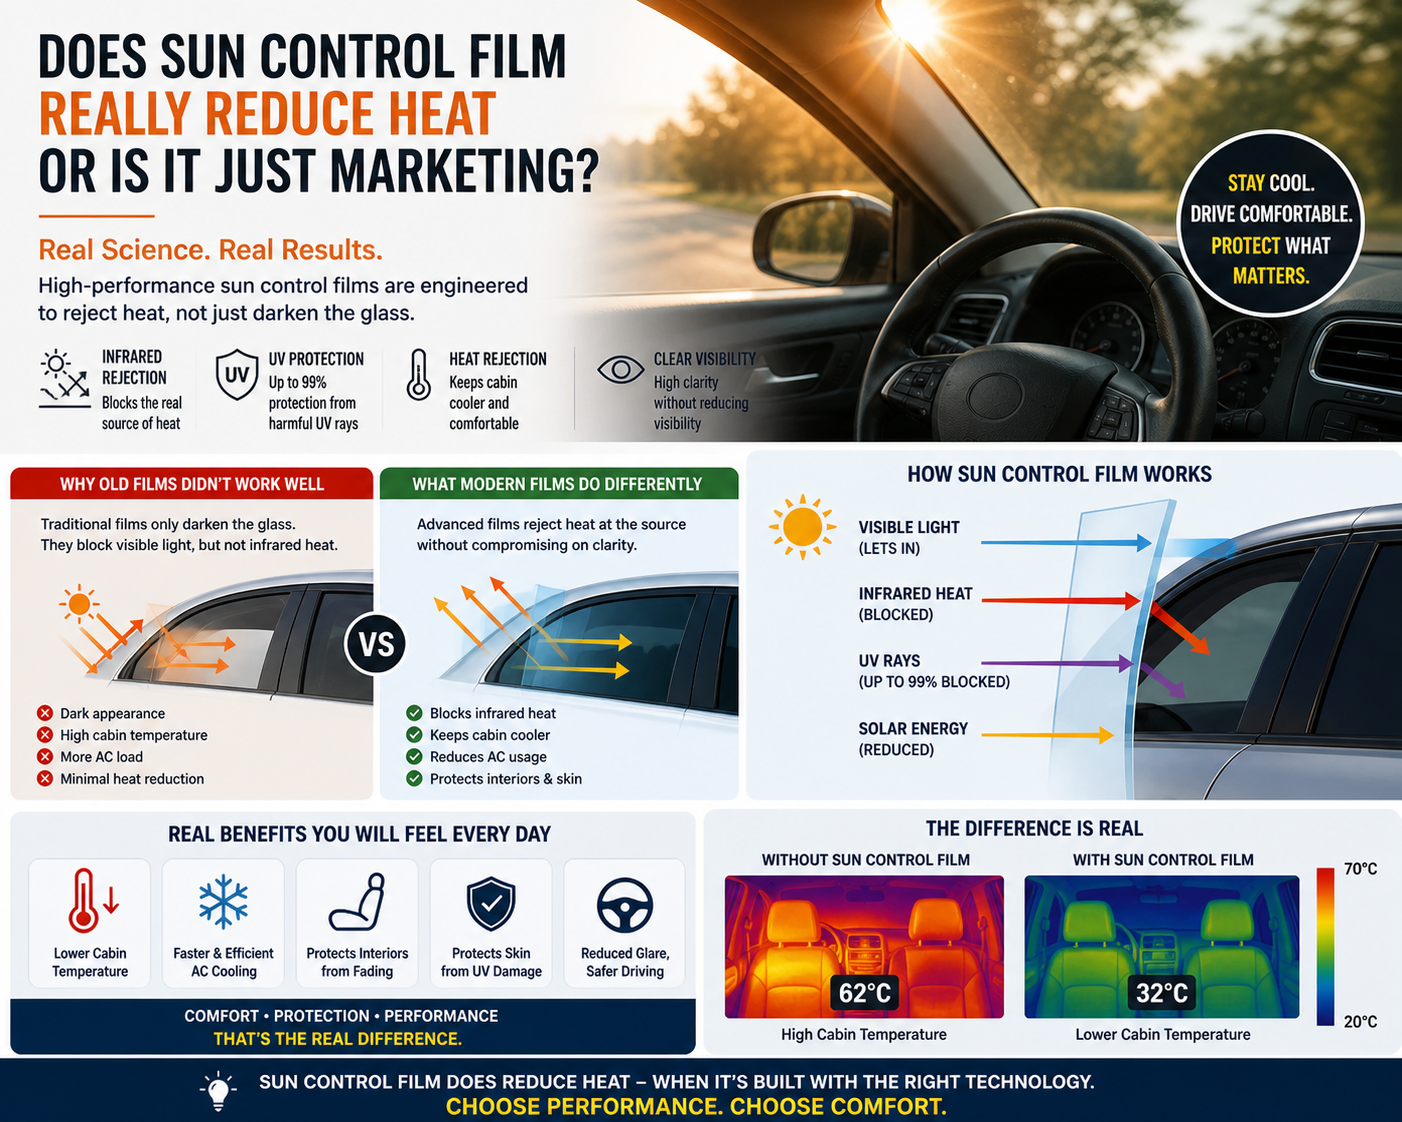
To answer this properly, you need to understand where the heat inside your car actually comes from. Most people assume it’s just sunlight entering through the glass. In reality, the biggest contributor is infrared radiation, which carries heat energy. Standard car glass allows a significant amount of this energy to pass through, where it gets trapped inside the cabin. That’s why your car heats up quickly even when it’s parked with windows closed.
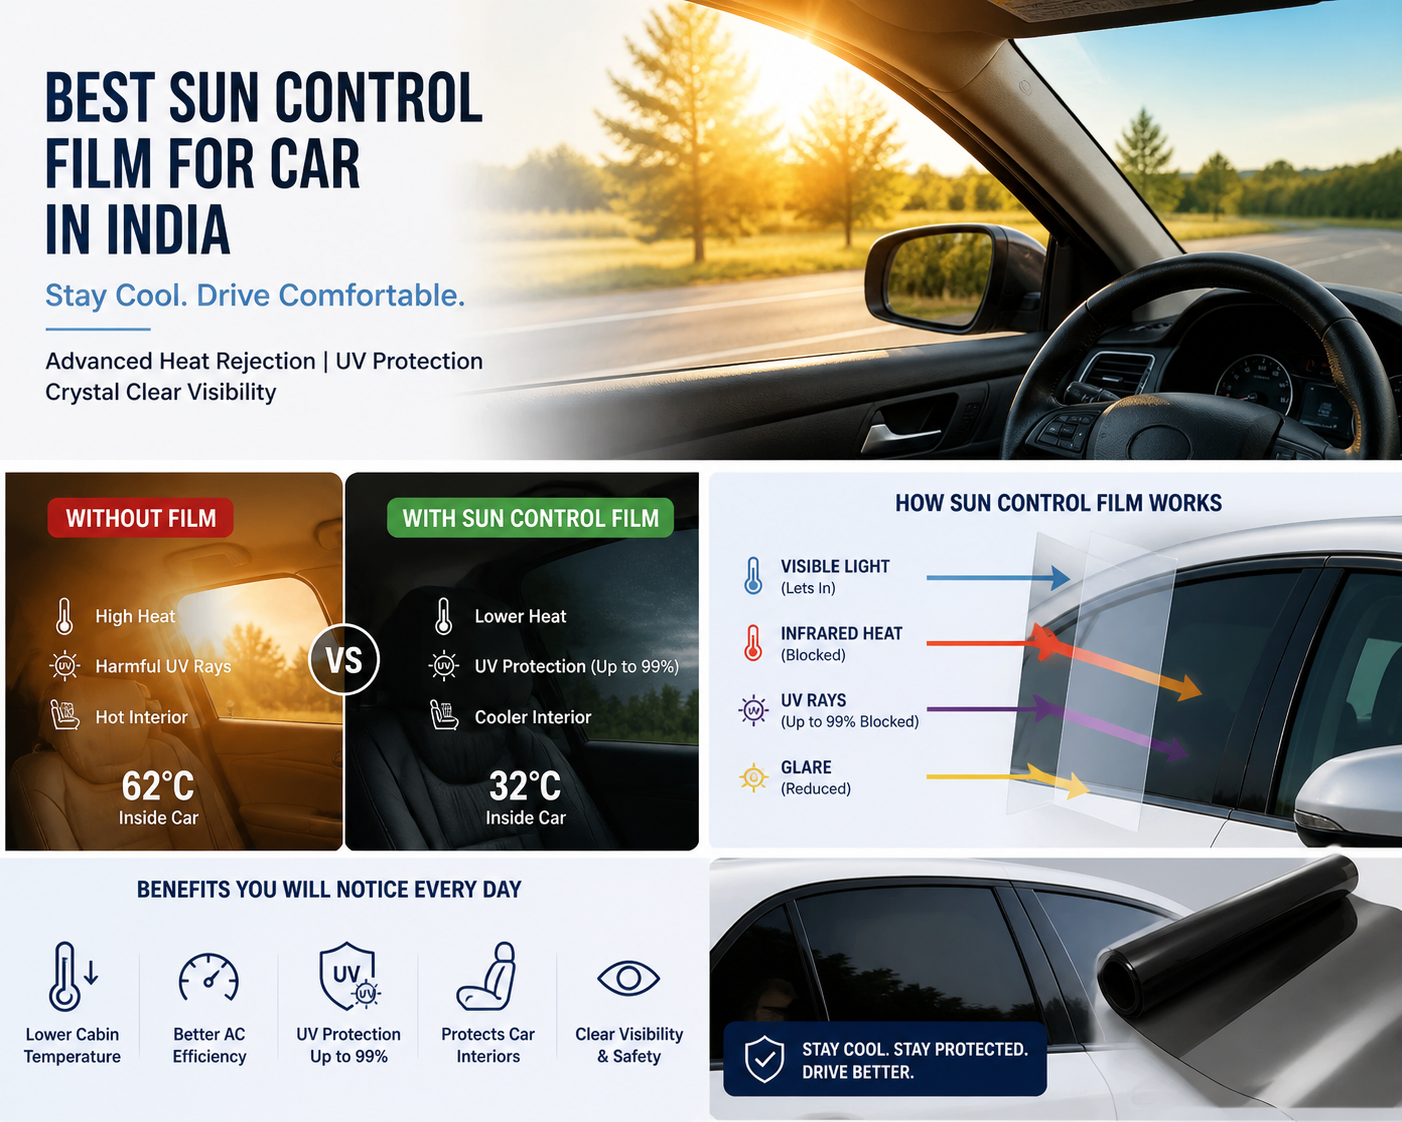
Step into a car parked under the Indian sun and you immediately understand the real problem—heat, not just light. The steering wheel burns, the seats trap warmth, and even after switching on the AC, it takes several minutes before the cabin becomes bearable. This is exactly why so many people search for the best sun control film for car in India, but end up confused by too many options that all claim the same thing.

A lot of car owners in India are stuck in a dilemma. On one side, there’s unbearable heat that makes driving uncomfortable. On the other, there’s the fear of getting fined for using a car window tint. So the obvious question becomes—can you use a sun control film for car without getting into legal trouble?
The answer is yes. But only if you understand where most people go wrong.

Autozcrave is a team of dedicated automotive enthusiasts and detailing experts who are committed to providing top-notch auto detailing solutions.
Lets make a better connection on Facebook and Instagram
Get the Latest Updates on New Product and Upcoming Sales
All rights reserved, Copyright 2024. Privacy Policy | Terms of Use